15/11/2012

Bad News Regarding Organized Home in 30 Days

My grand plans in organizing my home has stalled. As previously written HERE I had great plans for our outdoor shed. However, after cleaning it out, stripping it down and while painting it from the inside, we noticed mice droppings and dampness damaged walls. My grand idea of an extension to the house is not going to happen after all. 

More posts on the rest  of the house coming up soon!


02/10/2012

DIY Toy Boxes (Organized Home in 30 Days)

We cannot afford to buy proper toy boxes for the kids right now. I wasn't going to look at their unorganized toy boxes either. They were in a mess. It made me itch. Yuck. I bought contact paper from Walmart (surprise! surprise!) and Simon got some empty shoe boxes. Ask from your local shoe shops.

 Yes, simple. Yes, cheap. And yes, ORGANIZED!

 Contact paper and FREE boxes

We piled their toys into categories and took a look which needed their own boxes. The ones left, random individuals ended up in one box labelled as BITS and BATS a.k.a bits and bobs, bits and pieces to some of you.

 Labelled and pretty

 Organized room and a happy kids (mum!)

 Organized! 


 My son's toy boxes ended up looking something like this; "GORMITS", "ACTION FIGURES", "SOLDIERS" etc

My daughter's toy boxes were more like this; "BARBIES, "DOLLS", "PONIES" etc

 Before

After


21/09/2012

A Beautiful Notice Board


With me homeschooling a lot and Simon at work even more, communication is probably one of the most challenging things facing the family. If I tell Simon something verbally, within moments he's forgotten it (in his own words!). Not even latest technology seems to work. So, we have opted for a very functional, and dare I say, very pretty a way of communicating. A white board. I know what you are thinking, " what's so special about a white board!?" but this is no ordinary white board. I found this white board at Bed Bath&Beyond for 20 bucks. It is, essentially, a giant sticker. It's our very own family giant "post it note". I use the board for messages, brain storming, lists, grocery lists and most importantly a "Simon to-do list" :)


Lesson Record Diary for Homeschool


As a homeschooling mum, one of the biggest challenges I have had to face is knowing where we are and what we've done in the large number of subjects, books and activities that we have to do. So, therefore, we have implemented a lesson record diary. For sure, this is NOTHING new for those teachers of you out there, but this certainly helps a new teacher, like me. Each day we record each activity, subject and learning outcome that takes place. The diary really helps to keep on track, to check our progress and to help in reporting back to the moderator. Any diary that allows enough space for detailed notes will do. I got mine from Walmart and the Dollar Store.

Reward Chart

 If you need to motivate your child to do right, a reward chart is a good start. However, it would be good to teach the child to do right from the heart and not just because she/he will "get something out of it". There is a saying though, "what gets rewarded, gets repeated". I have created a Reward Chart for my kids with the areas that they are currently struggeling in. There are many areas they struggle in that I put on the chart, but I don't want to overwhelm them. So I choose the 'worst' that need dealing with a.s.a.p as in, bad attitude, ungratefulness, selfishness, disrespect, disobidience etc and then turn those into ' happy heart, sharing is caring, no back-chatting, instant obidience'... So far so good!


Restrategizing "Organizing my Home in 30 Days"

Okay, I know you all have been waiting for my updates on how my organizing has been going. Well, my start was strong. I had good plans for each area of the house. While I was organizing these areas, my plans changed from good to GREAT. Now, I have BIGGER plans for the areas I wan't to organize and this will take more than 30 days. I won't go over 30 days, as in, the tasks combined will not take more than 24h x 30. :) Are you curious about what my GREAT plans are?? Well I thought you'd never ask! Here they are!

The Shed will not be cleaned and organized, but it will be stripped, cleaned, painted and refurnished to be a very nice extention of our house! YES indeed! We will be getting rugs, a couch, scrapbooking table, shelving, mirrors, art- you name it! It will be a man cave, play den, pantry, art room and even during summers a great extra bedroom for visitors.

The Pantry will be dedicated for homeschooling and homeschooling only. Books, notebooks, workbooks, paper, crayons, art supplies, more books, more paper, craft supplies, board games etc

Laundry Room will be for linen, towels, blankets, basket etc

The Linen Cupboard will be extra space for clothes and other items.

Kayleigh's Room will have a whole new make over, paint job and a well organized toy area for her to maintain as well as a 3 years old can. We will go through her clothes and her princess dresses and give them a more accessable place for her to reach them.

The Backyard will be emptied from summer toys, gardening tools, pots, etc. We will decorate it to be a warm, welcoming back garden for the Autumn and Winter with logs, garden statues, Autumn plants and so on.

Joshua's Room will also get a make over, paint, toy organizing and so on.

Let the MAMMOTH task begin!


10/09/2012

Organizing the Cuttlery Drawer (Day 4)


People should be extra tidy and CLEAN, when it comes to the drawers in the kitchen. Especially, if you live in a country that has those little gross bugs called ROACHES! Coming from a country where the worst kitchen enemy was a silverfish, I was utterly grossed out by finding a small roach in my kitchen drawer. Everything else in my kitchen was organized except the drawers. The drawers were on the top of my list for Organizing my home in 30 days thank goodness! Think about it, you and your family eat with those utensils right!? Imagine what is on them. Keep your drawers and cupboards TIDY and SANITIZE them at least every other week.

I am NOT joking, my drawers looked like that. Seriously.


and


Keeping the utensils that I rarely use in a seperate container, keeps my drawer organized and prevents them from sliding all over. I would've used sticky matt for the rest of the untensils but I ran out. Will have to purchase some more!

08/09/2012

Homeschool: Creating a Classroom in Your Kitchen

I have been homeschooling my son for 2 years now. Officially 1. Untill now it has never really had that feeling of "school" that I hoped for. What I have tried to do is create a school like feeling that is one condusive to learning, but second, a place where I feel motivated to be a teacher. 

So, I went out and bought some things that would help me to create this educational enviroment, and spent the evening -and some of the night, putting up all the stuff. When we were done we had a white board, A-Z stickers, a month chart, days of the week cards, weather chart, and a reward chart up. 

In the morning when the kids woke up, they were amazed and happy.

 Click on the images below, to appear bigger.


Our Classroom.

 Months and weekdays.

 The blackboard and reward chart.

I look forward to teaching these little kiddos again on Monday!

T-Shirt Designs

 
Another fun craft idea to do with the kids! It was a great way to teach them how to design their own shirts and wear them with pride. They were really happy to create a shirt for themselves. It's special! 

I bought the plain t-shirts and fabric pens from Walmart.


Soap Cloud Experiment

Kids love it! Watch the bar of soap grow into a fluffy cloud! It has to be IVORY, else it wont work. Our first try did not work as well as our second go. The kids took the cloud to the bath afterwards.

 MUST be IVORY!


Ooh! Exciting!

 It's growing!

It's a cloud! (looks different every time)

05/09/2012

My Organized (Imperfect!) Home in 30 days

Here it is, finally, my post(s) on how I am going to organize my home in 30 days. Most of the areas in our home are pretty under control, but I still want make them even better. I will figure out what works best for our family, with our schedule, our daily activities and rhythm.

The areas I am going to take control over are,
  • laundry room
  • linen cupboard
  • kitchen pantry
  • entry ways
  • kids toys
  • crafts
  • dressers and wardrobes
  • bathroom
  • shed
  • our bedroom 
  • homeschooling shelves
I will also blog about de-cluttering, recycling, and re-using.There is no certain order I am going to do it. I know that I will start with the linen cupboard though, it has been bugging me for quite some time now. Also, the drawers in the kitchen look like a spoon factory vomited in them. So yes, that is on the top of my list too.

Let the organizing begin! Stay tuned!


01/09/2012

Housewife University: Forgiveness

Housewife University: Forgiveness

Animal Collage From Your Pantry


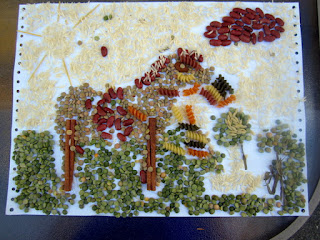
I took the kids to Maplewoods Farm. We had a fun time learning about the everyday life that takes place at a farm and how to even milk a cow old fashioned way. I asked my kids to count the animals they saw (besides the 100's of ducks) and write them down on a piece of paper they carried with them. At home I asked them to chose their favourite farm animal and to make a collage out with whatever we found in our pantry. This was a fun and frugal way of making art.


 Mid way of our art project.

 Almost there!

 J's Goat Collage.

K's Horse Collage.

23/08/2012

1st Years Gardening Part II

This was our vegetable patch at one point along the way. Kids can dig up all the weeds and roots while playing. Perfect!

I was very excited about my garden. I had BIG dreams about being very self sufficient, providing my family with tons of vegetables. I had BIG ideas! With everything going on at home, being big, heavy and pregnant, and having a hard enough time keeping up the basics at home, maybe gardening could've waited another calendar year. However, I am no quitter! Even if I did not give my 100% and did what should've been required, I still got - and am getting - something out of my garden experiment!
My broccoli plants grew really big but they produced small florets that I just couldn't see my family having to fight over during dinner time. Eventually, we dug them out, fed them our pet Guinea Pigs and made room for other plants, which I had sown into decomposable pots ready to plant.

The broccoli is on the left. They are still small in this picture. I never did take a picture of how big they grew. Lets put it this way, I could not see the soil around them. They stretched beyond the two planks along side them.


My lettuce was a hit. However, it may have been too much of a hassle outside and I could've easily had the plants inside. The lettuce grew fast and provided me the greens I needed for my famous smoothies. It was just the damn slugs that got to me. Endless slugs! Not a big fan of slimy slugs. I googled how to get rid of slugs without using overly harsh chemicals and how to make home-made, non-toxic pestacide. I will blog those recipes.


My spinach prematurely bolted, since June was a bit too cold. I planted new plants in July and we got a good freezer bag full of leaves. I gave the rest to the Guinea Pigs and removed the roots from my patch. I have big plans for my gardens empty space, oh yah! Just wait and see!

My spring onions did fine, grew well and were delish!! Yum YUM! I planted more!


I had planted my chard and dill right under our dryers 'fume pipe' which put me off. Our Guinea Pigs seem to benefit most from our garden.

1st years Gardening Part I

This is what was I was facing with all my little seedlings needing to be planted a.s.a.p! I had my work cut out for me and I was heavily pregnant too. Thank God for a loving, caring and strong husband. It took several days to clear this vegetable patch out. Several new gardening tools too, which we were luckily able to borrow.

I really like this picture above. It reminds me of the verse in Genesis!
 Genesis 3:16-19
16 To the woman he said,
“I will make your pains in childbearing very severe;
    with painful labour you will give birth to children.
Your desire will be for your husband,
    and he will rule over you. ”
17 To Adam he said, “Because you listened to your wife and ate fruit from the tree about which I commanded you, ‘You must not eat from it,’
“Cursed is the ground because of you;
    through painful toil you will eat food from it
    all the days of your life.
18 It will produce thorns and thistles for you,
    and you will eat the plants of the field.
19 By the sweat of your brow
    you will eat your food
until you return to the ground,
    since from it you were taken;
for dust you are
    and to dust you will return.”
I got them planted all in a rows. I placed planks in between the rows for easy access to the plants and also so I didn't have to stand on the soil.

I planted peas, broccoli, spinach, spring onions, tomatoes, dill and Swiss chard. Little did I know that half of these weren't going to work out as I had planned, for one reason or another. I will explain more in part II and III.
 My aunt had brought me herb pots for my yard.

The little beginnings of our pumpkins, squash, zucchini.


05/07/2012

DIY Laundry Whitener

I am so happy to discover a non-toxic, non-smelly laundry whitener! After some research and tries of my own, I have come to the conclusion that these ( below) are the best ways that work for us! 

The Complete Guide to Imperfect Homemaking http://www.imperfecthomemaking.com/2011/05/laundry-tip-whiter-whites-naturally.html


18/06/2012

DIY Tooth Paste

I've been wanting to post about DIY Tooth Paste for so long now but, I had to go through some trials and errors before I could.

I found a recipe online for DIY T-P and ordered the ingredients online. After about 2 weeks, I finally received the last potion for my toothpaste I could now give it a try. Well, to my dissapointment the toothpaste was horrid! I couldn't finish my teethbrushing and with the few first strokes I nearly vomited! It was BAD (for me).

I then did some research and came up with a *cathy version* yet a healthy version!

Ingredients
  • 2 T Coconut Oil
  • 2 T Baking Soda
  • 1 T Magnesium-Calcium Powder (emptied approx. 8 capsules)
  • 1/4 C fruit flavoured TUMS (grinded) -it's calcium! (optional)
  • 2 T xylitol powder
  • 10 g stevia powder
  • 20 drops of peppermint oil (other minty oils are available)
  • 10 drops of trace minerals  
verdict: Good enough. :)

24/05/2012

Anti-Bloat Detox Drink

Anti-Bloat Detox Drink (directly copied and pasted from Saila Savolainen's Blog Post)

A while back, I came across this Jillian Michaels drink recipe for getting rid of excess water weight.  She recommends using it for seven days in a row and that should flush out all the liquids you're retaining.  When I tried it myself, I didn't lose any weight, but I felt really refreshed and light while drinking it and afterwards.  So I definitely recommend this drink if you're feeling a bit heavy and bloated.  You can also just drink it for one day or do the whole detox.  Here's everything that you need:


INGREDIENTS:
- 2 tablespoons lemon juice
-1 tablespoon cranberry juice (no sugar added)
-dandelion infusion tea
-60 oz. (about 1.5 liters) water

STEPS:
1. Brew a cup of dandelion tea (I use Clipper's Dandelion & Burdock tea).
2. Mix the brewed tea with all the other ingredients.
3. Keep in the fridge and enjoy throughout the day (I like to give it a little stir before pouring a new glass). 

It's that simple!  Some people say it makes you feel a little light-headed, but I haven't really had that problem

-Saila

Cathy's Live Super Power Trail-Mix Fiber Bars

These are amazingly healthy power bars! They are a good source of fiber for your digestive system and not too harsh on your colon as some grains might be. They are beneficial to your health in great ways; they are pact with protein, antioxidants, vitamins, minerals, good omegas and give you the energy you need! 
These are truly Super Power Bars!

Ingredients

(soaked for over night)
1 1/2 C raw almonds
1 C       raisins
1/2 C    raw sesame seeds
1/2 C    dried cranberries
1/2 C    sunflower seeds

1/4 C    chia seeds soaked for 15minutes

1 apple, peeled, cored and shredded

(dry ingredients)
2/3 C    ground golden flax 
1/4 C    hemp protein
1/4 C    mesquite pod meal
1/4 C    cacao nibs
1/2 C    oats
10g       powdered stevia

1 tbsp   extra virgin olive oil
1 tbsp   raw coconut oil
1/2 C   apple juice

Optional: add 1 tbsp of lemon juice and a dash of salt. 

Drain the soaked ingredients and place them in a food processor. Grind them coarsly. Add the shredded apple, chia seeds, oils and apple juice. Stir in the dry ingredients and mix well.

 (look at the amazing fiber already!)

Dehydrator instructions: Spread onto paraflexx/teflexx sheets about 1cm thickness and score.


Set temperature to 135*F for 2h and then flip over, peel off sheets and set temperature at 115*F for another 4-6h untill dry.

Oven instructions: Spread onto parchment sheets on oven trays about 1cm thickness and score. Set the oven on the lowest temperature (50*C?) and leave oven door slightly open. After 3-5 hours flip over and remove sheet and dry untill dry. Usually over night.

Give it a try!

Want to know the difference with LIVE and RAW food?